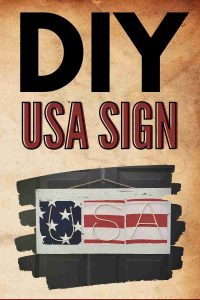
Easy DIY USA Sign
I realized the other day when organizing my holiday decor, that I only had a sad little box of patriotic decorations. I decided that I needed to add some more red, white & blue decor. Here I will show you how I turned a pair of American Flag Swim Trunks into an easy DIY USA sign.

This post may contain affiliate links, which means I’ll receive a commission if you purchase through my links, at no extra cost to you. Please read full disclosure for more information.
Step 1 – American Flag Fabric
I didn’t have much luck at the store finding American flag fabric, so when I ran into the thrift store and saw these swim trunks hanging up I grabbed them right away!

You don’t need to use swim trunks, there are a ton of different things you can use to recreate this sign.
Here are some other fabrics you can use:
- Old T-Shirts
- Bandanas
- Mini-Flags
- Plain Red, White & Blue Fabric Strips
- Patriotic Printed Fabric Squares
- Scrapbook Paper Patriotic
- American Flag Gift Bags
As you can see there are a lot of different options out there. Head to your local craft store and see what you can find!
STEP 2 – CUT FABRIC
The first thing I did to make my DIY USA Sign was to cut the swim trunks up. I ended up using these scraps for a few different projects!

Step 3 – Find Board To Use As Backing
I have had this random wood sign sitting in my craft storage room for a long time! I was glad to finally put it to good use.
You can make your own wood sign with pallet board or scrap wood or you can buy a pre-made one like this.
You can use this to decorate for Memorial Day, Fourth of July, and Labor Day!

Step 4 – Attach Fabric To Wood Sign
I thought about using mod podge to attach these but instead went with the handy glue gun. This was quick and easy – just how I like it!

Step 5- DIY USA Sign Letters
For the letters I used this macrame cord. You can also use some twine, but for this project I preferred something a bit more heavy.
I just kinda eyeballed the sizes. Make sure to dry fit them all before gluing anything down. There is also no need to glue the entire letter, just put a dab of hot glue on the ends and one in the middle and you won’t have to worry about a glob of glue getting everywhere.

There you have it! This was such a simple DIY Project. Soon I will show you what I made with the leftover fabric I had.

Thanks for stopping by and checking out this DIY USA Sign! Make sure to take a look as some other easy DIY Projects you can make.
- Super Easy Outdoor Lantern
- Thrift Store Tray Makeover
- Coil Spring Vase
- Easy Outdoor Candle Holder
- Two-Tone Planter ($300 Knock-off)
- Tic Tac Toe Board
- DIY Farmhouse Window Frame
Thanks for stopping by! Follow along on Pinterest, Facebook, or Instagram for more inspiration!

DON’T MISS


Very creative. Thank you. 🌱💛